Sunday, September 29, 2013

Connecting Up Feathers in borders


How to get the angle of feathers so you can have a continuous feather border.


I had to do  ovals of feathers and the connecting of the feathers would show up if not perfect.


I do borders all the time that go around the quilt and connect them up so sometimes they are perfect and sometimes not.  So I set out to figure out how to do it consistently 

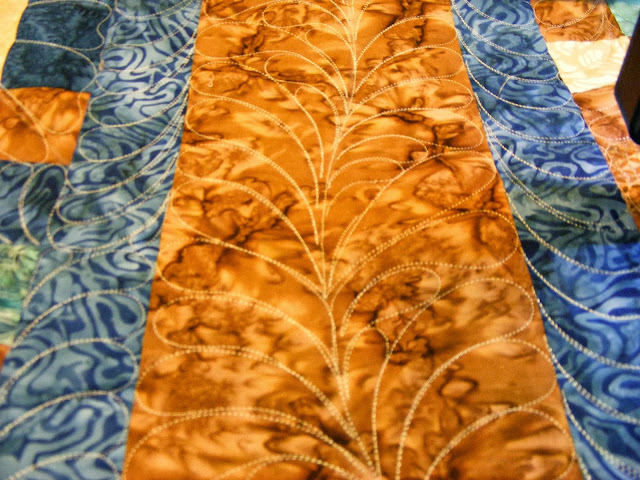
My thought was that I know the angle of my feathers is 45 degrees so why not mark that angle with chalk.  Of course my line is not straight it is a curve.  At the point where I want to start my feather, I put a line straight across the line of the stem no matter what angle it is at.  I want 90 degree angles


 You can see just below the feathers a chalk line forming 90 degree angles on the stem.  In the first feather on each side of the stem you can see the 45 degree line I made by dividing that 90 degree line in half  On the right side of the photo in the blue you can see a chalked line 90 degrees to the seam.  The seam was used as if it was the stem.  Again you can see the chalk mark in that first feather at the 45 degree angle..


The next photo shows a section where the feathers have been joined.  Can you find the join?  I'm not sure myself.
The aftermath of the bags.

I was at Greenway the nursing home attached to the assisted living I took walker bags to the other day and gave one to each resident that had a walker.  I cruised through Greenway after the delivery with a few extras.  So today, one resident motioned me over.  She had seen the bags and thought hers was pretty dull and boring in comparison and would like one made for her.   Yeah they are a success.

Sunday, September 22, 2013

A Bag for a Walker with a little class

I needed to finalize the pattern, the River Valley Stitchers would use for our project making bags for walkers  for the nursing homes in our area.  Meantime I went to a longarmers quilt group where a 10 minute tablerunner was shown.  I married the two.


Cut two strips, one is 8  1/2" x WOF and the other 15" x WOF.  Sew the strips together.  Turn and press centering the smaller strip.


Clean finish the ends by turning under twice which will cover and his all those selvedges.  If the selvedges are too large, you can trim a little.  These ends will become the top of the pockets.


  Mark about 9" from the edges that you just clean finished.  Turn at the at point to form the pockets


Sew from the bottom of one pocket topstitching to the bottom of the other pocket.  At the same time you can slip in a piece of velcro and have it held by the topstiching.  I put the velcro just below the clean finished edge of the top of the pocket.


Just that quickly you are finished.

Thursday, September 19, 2013

The DWR is quilted


The stop watch says a little over 27 hours to quilt  I did forget to turn it on a couple of times.  I used 21 class M bobbins with very fine Glide thread.    The greatest amount of time was the procrastinating before  putting it on the machine to quilt.

My goals in quilting:  I wanted the quilting on the rings to show that they intertwined and I wanted the birds to puff.  


To that end, I thought maybe feathered rings, one clockwise and the next, counterclockwise would do it.  But yes it was a challenge to keep clockwise and counterclockwise straight especially on the ends of the quilt on the partial rings.  I chalked C and CO in the blocks to help me.   The first row took 5 hours to quilt setting up the pattern of the rings.   I understand now why the DWR's that I see don't even quilt the rings letting them puff or do a simple non intertwining pattern.  The bulk in the seams can be a problem.  I was very careful when ironing my seams to spread out the bulk as much as possible.                                                  


McTavishing would make the background flat to puff the birds.  But I have been doing that for about 8 years so I included feathers and spirals in the McTavishing to give it my own signature.  


The quilt top was a challenge to piece, my first curved pieced quilt.  I did a tablerunner to try it to see if I could even piece this top.  Then it was used to test the quilting.  Now  I have to learn to bind that irregular outside edge.  The tablerunner will be the trial for that too. 

 The color on the photo below is a little more true.


Wednesday, September 18, 2013

The deer panel with checkerboard border

I have two young great nephews who are wild about deer.  One tracks them with his Grandpa.  The other has his room decorated in camoflauge.   I saw the deer panel on the internet and ordered a number of them. The quilts are for young boys so I didn't want to do a lot of patchwork yet I wanted to make them special.   I decided just to border them out and one border would be a checkerboard.  The first quilt was made for my own son.  And thankfully I wrote down what I had done.


\
I was going to do 1" finished sized squares for the checkerboard..  In order to have a checkerboard go all the way around and not have two same color squares next to each other on the corner, one side must be an even number of patches and the adjacent side must be an odd number of patches.   My patches are an inch so that makes it easy.  I didn't want to cut the panel any smaller than I had to but I did cut it to an full inch measurement plus the 1/2" seam allowance.  If one side  is an even number and the other is odd, you are golden.  But if they are both even or both odd, or you can not  get a full inch finished measurement, use the next border to fudge this.

My panel when squared up measured 35 1/2" x 43 1/2" with seams included. Both odd.   To do the math for the next border I used the finished size which would be 35" x 43", the finished measurement.     I decided to keep my side measurement as the uneven.  I would sew  a 2" finished border actually cutting 2 1/2" with seams.

I would account for my need to have one side an even number with the top and bottom borders..  I wanted to have the bottom and top border add about 6" each to the length of the quilt.  My length of the panel was 43"  I needed to an  extra inch to make it an even number. to accomplish this that would be a half inch to each of the two borders making an overall total of one inch.  .  I wanted my borders to each be at least six inches wide.    Six inches plus the extra half inch to get that even number on the side is 6 1/2" for the Finished border    Then I have to add my seam allowance making the measurement I will cut for my border cut 7".  .


  But even before I start the checkboard, I want another small border  and will cut it 2 1/2 inches adding two inches to each side.  The checkerboard will be the third border.

 This is the start of the quilt with the panel with the first border on.   The next border will be black and cut 2 1/2 inches wide cut measurement.


Next I have to figure out how many strips to cut for the one inch checkerboard three squares wide.

If I measure my quilt it is now 43 1/2" x 60 1/2".  The finished size is 43 x 60 and that is what I will use to

I need to add all four sides to get the perimeter and then add 3" apiece for all four corners.   Mine totals  a length of checkerboard about 218 inches.    My strips are about 40 inches wide and the segment for each checkerboard piece will be 1 1/2".  That is about 26 from each strip set.  So I need   9 strip sets  Each strip set has 3 strips of fabric WOF x 1 1/2".

I need two different strip sets.  One black, tan, black and one tan,black, tan.  Sort of like when you do 9 patches. I will make 4 1/2 strips sets the WOF of one color combination  and 4 1/2 of the other.color combination    I will cut 14  1 1/2" by WOF strips from each color to get enough strips to make my strips sets.  If there is no math error I will have little waste.  

After that it is just a matter of putting on borders until I get as big as I want.  For the one already made, I used 6" and 8" Finished Size.   I cut 6 1/2 for the tan  and 8 1/2 for the black with seam allowances added..  My ending measurement (if my math is correct is 94" x 77".  And I should have two very happy great nephews.

After I ordered the panel off the internet and made the first quilt, I found the panels at Walmart.  If I hadn't had free shipping, I would have been upset.
  

Tuesday, September 17, 2013

My first post.

A little about me

My name is Deb.   I am a quilter.  I think in another life I was an efficiency manager somewhere.  I like to solve problems.  I make discoveries as I quilt of how to do things easier and how to make them look better.

My current obsession is a repeat of how I started out, with quilted clothing.  Here in Wisconsin we are cold for 9 months of the year.  Vests and jackets are a great addition to a wardrobe and quilted or patchworked is just plain fun to wear.  The photo is me at the Madison Expo next to my quilt.  The skirt is made from bluejeans, the tote is quilted and the watch band is patchwork.


The first of the jackets and vests  shows a patchwork one that is at years old and one of the new jackets.

 The second photo show a vest using patches from denim and laces.  It was a great way to test some of those designs that came with my machine.  The denim vest has the pattern showing better on the lining than the denim outside but oh well, the outer color is better for me to wear.
 The purple vest is from fabric given to me by Kathleen, a friend.  It is actually the backside of the fabric.  She challenged me to have it made up into something by our local group meeting 10 days away.  The "right" side of the fabric was purple and metallic gold.

 The rose vest matches a quilt.  The blue/purple vest is a snow dyed fabric that I tried out a new design on.


In my blog, I am hoping to share what I am working on, what I am learning and discovering.

Tips on making quilted clothing

As I said, my current obsession is making vests and jackets.  This is what I have learned:

 I have discovered it is better to do the quilting on rectangles.  I mark the outline of my pattern  with chalk then add and inch outside of that line.  I quilt out to include that extra inch.  After all is quilted, I wash the rectangles.  Then I cut out my pattern pieces.  In this way, I know the exact size my garment will turn out after I have shrunk it up  and that it will be that same size after I have wash it.


This is one of the rectangles that will make the fronts of a vest  In the middle of the circles, you can see blank space.  That is the waste area of the neckline. My favorite batting is wool.  I am told silk is also wonderful but have not tried it yet.  Wool stays soft and drapes.  I am told that also applies to Silk.  Polyester batting will not drape as well and is not as comfortable to wear.